Feature Overview
Finance Register is a local-first personal finance app for day-to-day money management. It is built around accounts, a full transaction register, scheduled activity, budgets, reports, backups, archive tools, and planning features. Every account now uses the same top-level tabs: Dashboard, Transactions, Bills & Income, Calendar, Budget, and Reports. The content inside those tabs still adapts to the selected account type.
Daily money tracking: Use the Transactions register, Calendar, and Dashboard to stay on top of balances, spending, payments, and upcoming activity.
Planning: Use Scheduled Transactions, Budgets, Savings Goals, forecast balances, sandbox scenarios, and loan planning tools for supported mortgage and loan accounts to plan ahead without leaving the app.
Protection: Use password protection, encrypted backups, restore preview, export backup, sandbox safety backups, and reconcile to protect your data and verify your balances.
Migration: Use Import Transactions... for CSV, OFX, QFX, QBO, and QIF files, or use the separate credit card statement CSV importer when your card issuer provides a statement export.
Account types and what they are for
- Checking, Savings, and Cash: Everyday asset accounts for spending, deposits, savings transfers, budgeting, and reports.
- Credit Card: A liability account for card charges and card payments. It can import monthly statement CSV files, track utilization, estimate next due amounts, and link payments back to checking.
- Mortgage Loan: A long-term liability account that focuses on balance owed, estimated payment, interest, principal reduction, escrow, and payoff timeline.
- Loan: A non-mortgage installment loan such as a car loan or personal loan. It behaves like a mortgage account without escrow.
Getting Started
Use this section the first time you set up Finance Register or whenever you open an existing account again later.
Open or create an account file
- Start the app.
- Choose New Account to create a fresh account, Open File to reopen an existing
.frc file, or Restore Backup to rebuild an account from a backup file.
- When creating a new account, enter the account name, choose the account type, and fill in the setup fields for that account.
- Save the account when prompted so the app has a working
.frc file.
Tip: You can create checking, savings, cash, credit card, mortgage loan, and loan accounts. The sidebar keeps them grouped by account type.
Choose the right setup values
- Checking, Savings, Cash: enter the current opening balance.
- Credit Card: enter the starting amount owed, optional APR, optional credit limit, and statement closing and due day of month.
- Mortgage Loan and Loan: enter the original financed loan amount, APR, loan start date, and loan term. Mortgages also support a monthly escrow amount.
Use Starting Balance as of when needed
Starting balance as of is the account's anchor date. It tells Finance Register the date your starting balance takes effect. Transactions dated before that anchor date are kept for history, but they do not affect the account's current balance.
- Use it when you create an account with a starting balance and later import older history that was already included in that starting balance before the anchor date.
- This is especially helpful for checking, savings, cash, HSA, credit card, mortgage, and loan accounts when you want older imported transactions to stay visible without changing today's balance.
- If you leave it unset, older transactions can still affect the live balance.
Work with the Accounts sidebar
- Click any account name in the sidebar to switch the whole app to that account.
- Use the save and backup controls near the top of the sidebar for quick file actions.
- Use the forecast range control at the bottom of the sidebar to change how far scheduled activity is projected into the future and to update the header's forecast balance.
Rename, duplicate, or sandbox an account
- Right-click an account in the sidebar.
- Choose Edit Account to update the account name and settings.
- Choose the duplicate command from the File menu when you want a safe copy for testing.
- Choose Start Sandbox from the File menu to create a protected backup of the live account and switch into a temporary sandbox copy for testing changes.
Language, region, and currency
- Open Settings when you want to change how the app formats dates, numbers, and currency.
- Finance Register includes language options for English, French, German, Japanese, and Spanish.
- Choose the matching currency and region combination when you want localized formatting such as Canadian Dollar or Mexican Peso.
Sandbox Scenarios
Sandbox Scenarios let you test changes safely inside a duplicate of the current account without touching the live account until you choose to commit.
What a sandbox is for
- Use it when you want to test edits, cleanup, imports, or transaction changes without risking the live account.
- The sandbox is account-scoped. It does not put the whole app into a temporary mode.
- The sandbox copy is clearly labeled so you can tell it apart from the original account.
Start a sandbox
- Select the live account you want to test.
- Choose File > Start Sandbox.
- Finance Register creates a safety backup of the live account first, then opens a sandbox copy named from the original account.
- The sandbox badge and banner make it clear you are working in the temporary copy.
Backup rules
- Finance Register creates a protected backup of the original live account before the sandbox is created.
- Sandbox copies are not treated like normal live accounts for backup export or routine backup flow.
- If the sandbox is committed, it becomes the live account and can participate in normal backups after that point.
- If the sandbox is discarded, the sandbox copy is deleted and does not remain as a backed-up account version.
Commit or discard
- Use File > Commit Sandbox when you want to keep the sandbox result as the new live account.
- Commit creates one final backup of the original live account, replaces it with the sandbox copy, and restores the original account name.
- Use File > Discard Sandbox when you want to delete the sandbox and return to the untouched live account.
Important: Sandbox Scenarios are meant for safe account testing. They do not merge two accounts together, and they do not compare changes side by side.
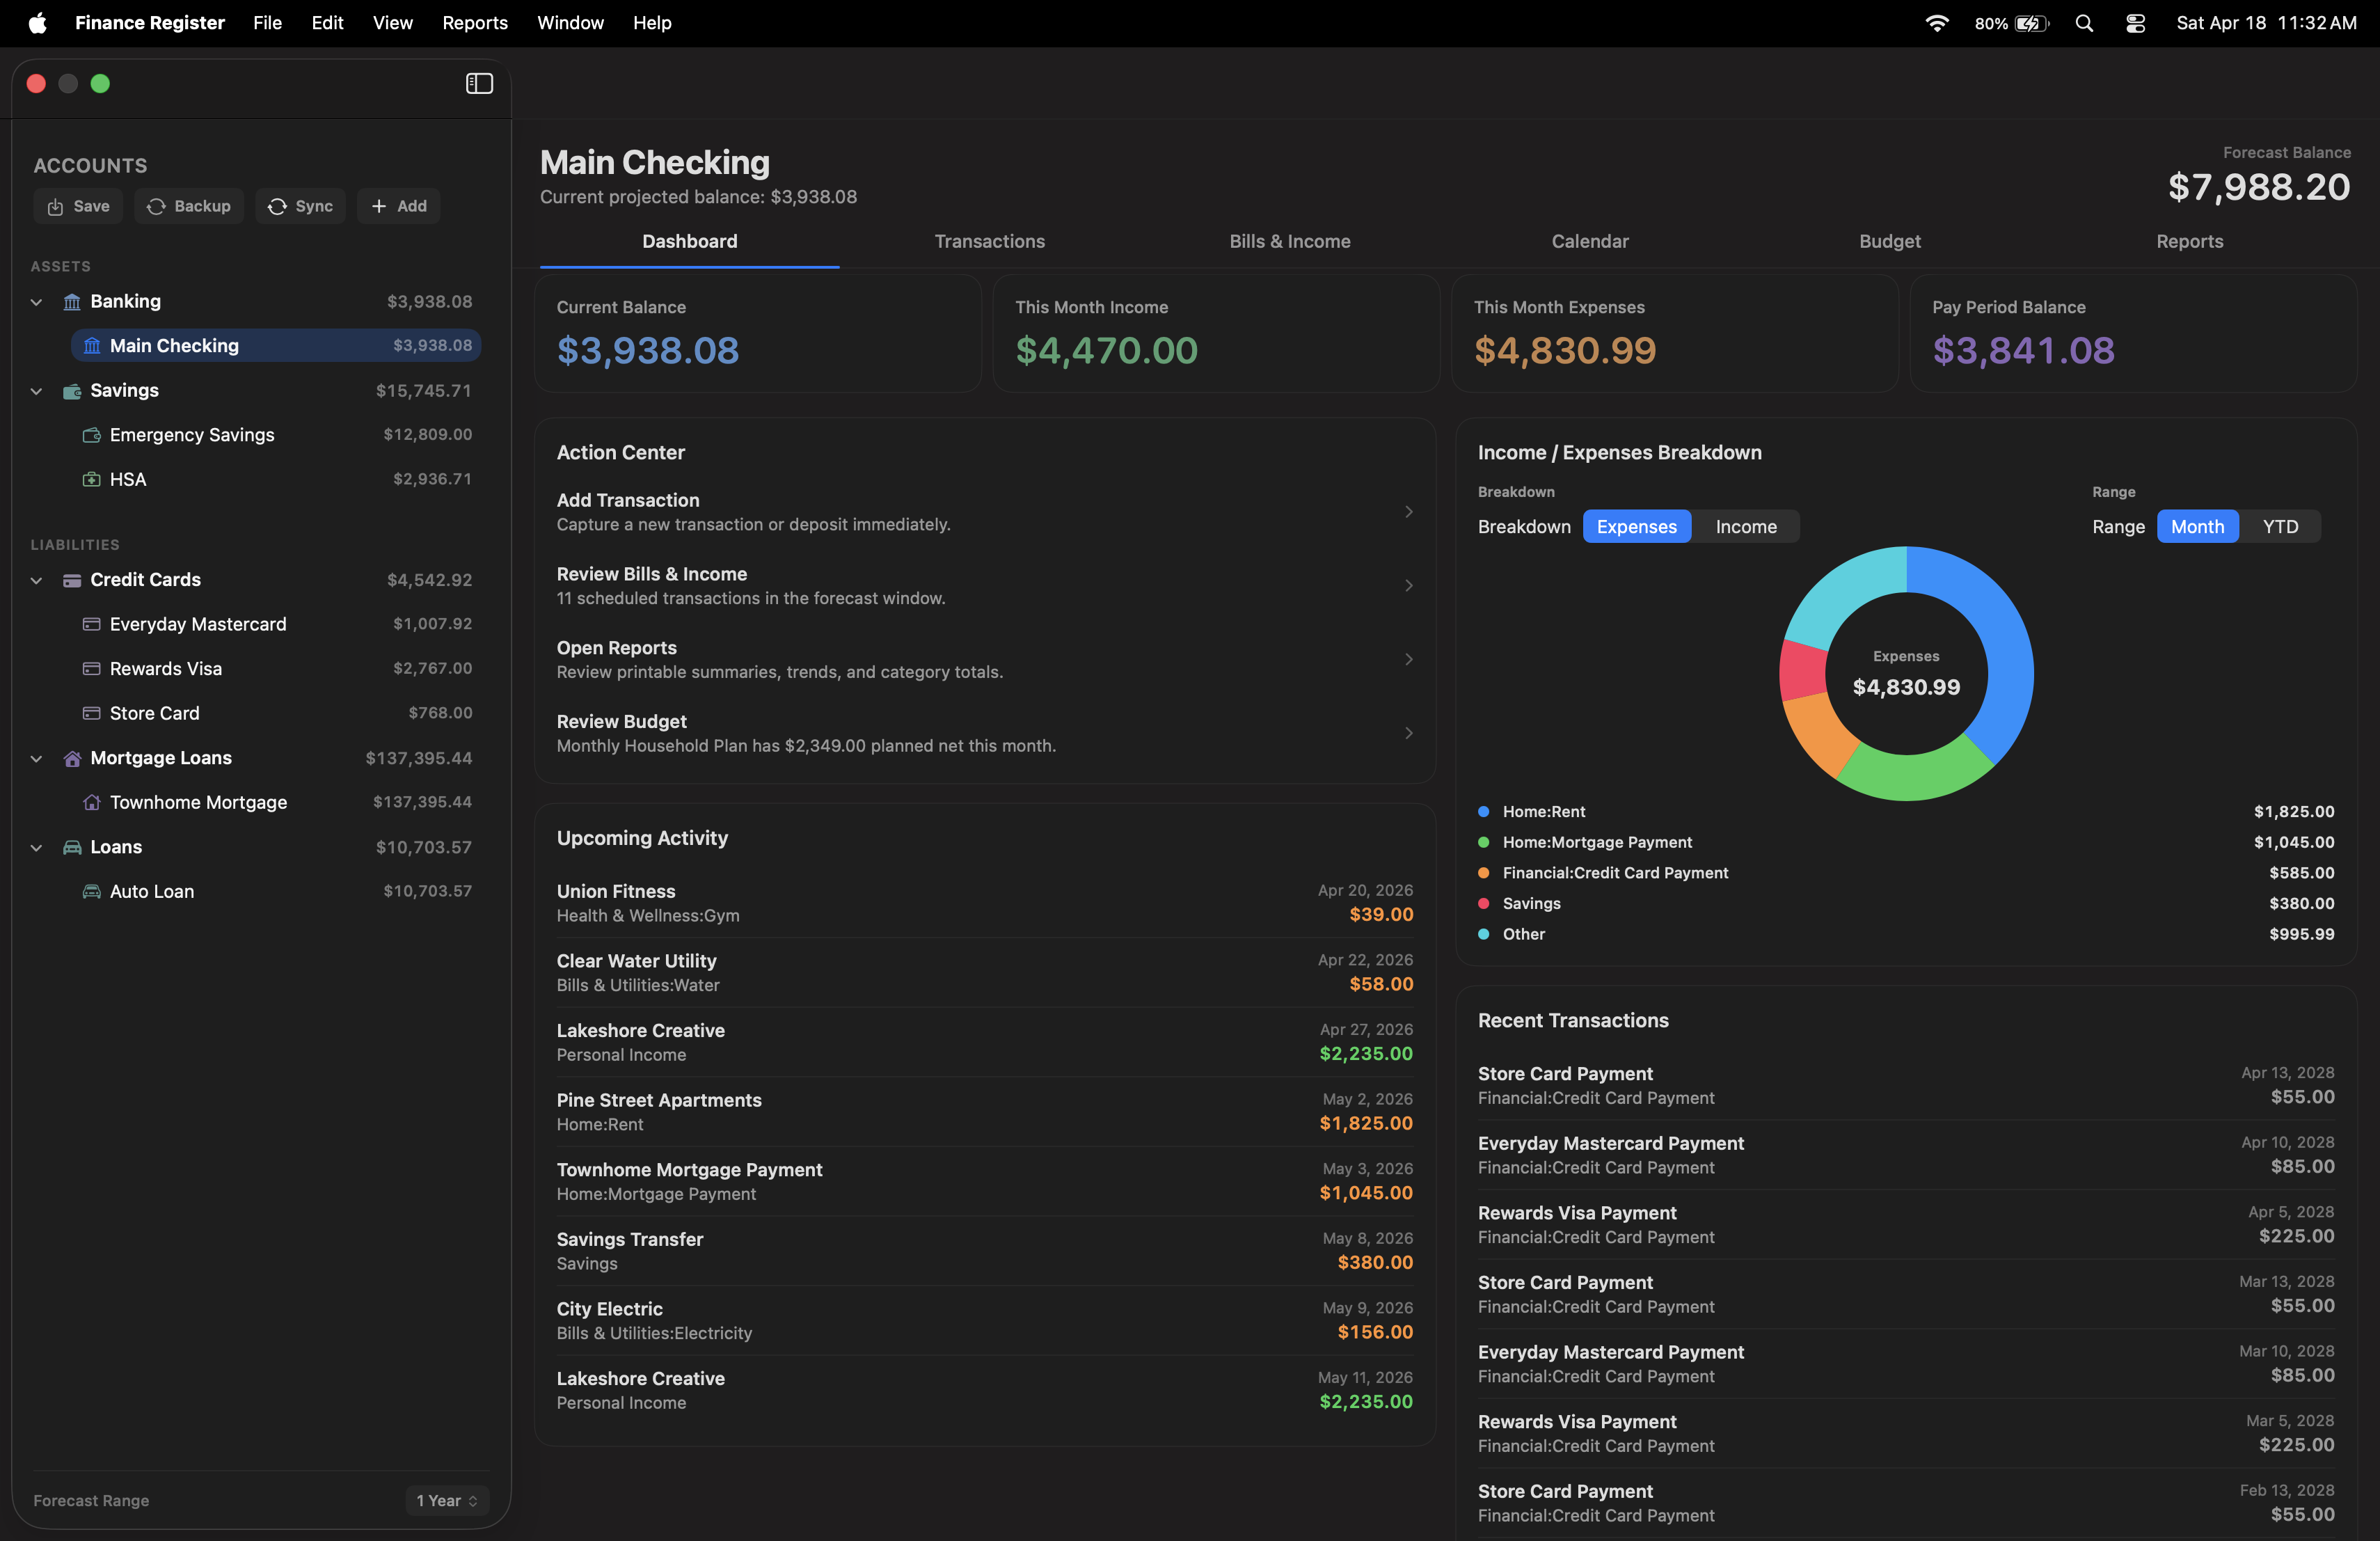
Dashboard
The dashboard is your overview screen. It is designed to show what matters right now before you move into the full register. The exact panels change by account type so checking, credit card, mortgage, and loan accounts each show the most relevant information.
Read the top summary cards
- Forecast Balance shows the projected account balance for the currently selected forecast range.
- This Month Income and This Month Expenses show posted activity for the current month.
- Year-End Balance projects the current account through the end of the year using scheduled transactions.
Use the dashboard sections
- Use Action Center to jump to Add Transaction, Bills & Income, Reports, or Budget.
- Use Upcoming Activity to review what is due soon, including exception rows like insufficient funds.
- Use Income / Expenses Breakdown to switch between income and expense categories for Month or YTD.
- Use Recent Transactions to jump back into recent register activity.
Note: Clicking dashboard cards and lists can drill into the Transactions register with the matching account and filters.
Credit card dashboard
- Shows Current Balance Owed, available credit or over-limit state, utilization, estimated next due amount, and card-health details.
- Uses card language such as Charge and Payment instead of generic income and expense wording.
- Warns more clearly when the card is near or over the credit limit.
Mortgage and loan dashboards
- Focus on Current Balance Owed, estimated monthly payment, interest, principal reduction, and payoff timeline.
- Mortgage accounts also show monthly escrow.
- Upcoming activity on these accounts is built around scheduled payments, not general spending categories.
Transactions
The Transactions tab is the main register for posted activity. It supports filtering, search, attachments, split transactions, range selection, and running balances.
Add a transaction
- Open the Transactions tab.
- Click New in the bottom action bar, use the dashboard action, or use the right-click menu.
- Enter the date, payee, category, amount, type, and paid status.
- If needed, turn on the Scheduled checkbox to switch the same sheet into the scheduled transaction form.
- Save the transaction.
Understand account-specific transaction wording
- Checking, Savings, Cash: use standard spending and income wording.
- Credit Card, Mortgage, Loan: use liability wording such as Charge / Fee and Payment.
- Liability accounts use Paid / Unpaid status wording rather than deposit wording.
Pay a credit card, mortgage, or loan from another account
- Open the liability account and create a Payment.
- Choose the Pay From account, such as checking.
- The app creates the matching withdrawal in the source account automatically.
- If the payment is larger than the amount owed, the app reduces it to the payoff amount so the liability reaches exactly $0.00 instead of going negative.
Edit, duplicate, or delete
- Select a register row.
- Use the bottom action bar or right-click menu to Edit, Duplicate Transaction, or Delete.
- For scheduled transactions, the context menu can show both Edit and Edit All Instances.
Use filters, search, and multi-select
- Use the date, type, and status filters above the grid to narrow what is visible.
- Use the search field to find payees, categories, memo text, or tags.
- Click one row, then Shift-click another row to select a range.
- Read the bottom-right summary to see Total Expense or Total Income for the selected rows.
Attach files
- Use the paperclip column in the register.
- Add an attachment from the row menu or drag a file onto the attachment area.
- Open or remove attachments from the same row controls.
Split transactions: Select one transaction and click Split to break it into multiple category lines. The split totals must match the original transaction amount.
Running balances: Negative running balances are shown in red so the account clearly shows when it is overdrawn.
Scheduled Transactions
Every account can open Bills & Income. Checking, savings, and cash accounts use it as the main list for recurring bills and income. Credit cards, loans, and mortgages can also enter the tab, but liability accounts use liability-aware wording and linked payment behavior where appropriate.
Create a scheduled bill or income item
- Open Bills & Income.
- Choose the Bills or Income tab.
- Click Add Scheduled Bill or Add Scheduled Income.
- Enter the title, category, amount, type, start date, and frequency.
- Optionally set an end date or stop after a number of payments.
- Save the schedule.
Mark scheduled items paid or deposited
- Find the item in Bills & Income, the Calendar, or the Transactions register.
- Click Mark as Paid.
- If earlier scheduled transactions in the same series are still unpaid, the app blocks the later payment and shows a warning first.
Edit one occurrence or the whole series
- Right-click the scheduled row or use the register actions.
- Choose Edit to change only the current occurrence.
- Choose Edit All Instances to change the whole scheduled series.
Skip or defer an upcoming occurrence
- Open the scheduled item’s row menu.
- Choose Skip Next Occurrence to ignore the next one.
- Choose Defer Next Occurrence to move it by one day, one week, or one month.
Memorized payees: When you enter a payee you have used before, Finance Register can autofill category, amount, type, tags, and scheduled defaults from earlier matching entries.
Credit card scheduled payments
- Open a credit card account.
- Open Bills & Income or use the dashboard actions for the card.
- Create a scheduled Payment when you want an ongoing monthly payoff plan.
- Choose the account the payment comes from, such as checking.
- If the card balance reaches zero, the linked payment series stops. If new charges are added later, the series can resume automatically.
Credit Card Accounts
Credit card accounts are liability accounts. That means the balance represents money you owe, not money you have available to spend. Charges increase the amount owed. Payments reduce the amount owed.
Set up a credit card account
- Create a new account and choose Credit Card.
- Enter the starting amount owed if you already have a balance on the card.
- Set Starting balance as of when that starting amount already includes older card activity you may import later, so the anchor date keeps that older history from changing the live balance.
- Optionally enter the APR %, credit limit, statement closing day of month, and payment due day of month.
- Save the account.
Understand the credit card dashboard
- Current Balance Owed shows what the app believes you owe right now.
- Available Credit and Utilization help show how close the card is to the limit.
- Estimated Next Due Amount is an estimate, not an issuer-guaranteed exact statement amount.
- Warnings appear more clearly when the card is near or over the credit limit.
Add charges and payments correctly
- Use Charge for card spending, fees, or interest charges.
- Use Payment when money is being sent to the card.
- When entering a payment, choose the Pay From account so the matching withdrawal is created there automatically.
- If the entered payment is larger than the amount owed, Finance Register reduces it to the payoff amount so the card reaches zero instead of going negative.
Import a monthly statement
- Open the credit card account.
- Choose File > Import Credit Card Statement CSV....
- Select the CSV exported by your card issuer.
- Review the import summary to confirm how many rows were imported and how many duplicates were skipped.
Important: This import path depends on the card issuer offering a CSV export. If your issuer does not export CSV, use manual entry instead.
Mortgage and Loan Accounts
Mortgage and loan accounts are also liability accounts, but they are designed around amortized debt instead of everyday spending. Their dashboards focus on balance owed, payment estimates, principal reduction, and payoff timing.
Set up a mortgage account
Starting balance as of can be used here as the account's anchor date when you enter a starting balance and want older imported history to remain visible without changing the current balance.
- Create a new account and choose Mortgage Loan.
- Enter the original financed loan amount, not the current payoff amount.
- Enter the APR %, loan start date, and loan term in years.
- Enter the monthly escrow amount if the mortgage payment includes escrow.
- Save the account.
Set up a non-mortgage loan account
Starting balance as of can be used here as the account's anchor date when you enter a starting balance and want older imported history to remain visible without changing the current balance.
- Create a new account and choose Loan.
- Enter the original loan amount, APR, loan start date, and loan term.
- Save the account.
Understand the mortgage and loan dashboards
- Current Balance Owed shows the remaining balance estimate.
- Estimated Monthly Payment is based on the loan amount, APR, and term.
- Estimated Monthly Interest and Estimated Principal This Month help show how each payment is split conceptually.
- Mortgage accounts also show Monthly Escrow.
- Mortgage Details or Loan Details summarize the original amount, start date, term, and estimated payoff date.
What tabs these accounts use
- Mortgage Loan: uses the same top-level tabs as every other account, but the content is liability-focused.
- Loan: also keeps the shared tab structure while surfacing debt-specific details, payment behavior, and forecast information.
- Some reports and planning tools are naturally more useful on checking, savings, and cash accounts, but the top-level navigation stays consistent.
Pay a mortgage or loan from checking
- Create a payment from the mortgage or loan account, or create a linked scheduled payment.
- Choose the source account that pays it, such as checking.
- The matching withdrawal is created automatically in the source account.
- Upcoming activity on the liability dashboard shows those linked future payments inside the current forecast window.
Use the Debt Payoff Planner
- Open the mortgage or loan dashboard.
- Choose Open Debt Payoff Planner from Action Center.
- Compare the base payoff schedule with an added monthly payment amount when enough payment and APR data is available.
- Use the estimate as a planning tool, then decide whether to update your live payment workflow.
Calendar
The Calendar tab shows the month at a glance and combines posted and scheduled activity.
Open a day
- Open the Calendar tab.
- Use Today, the left arrow, or the right arrow to change the month.
- Click any in-month day cell to open that day’s detail window.
Add activity from the calendar
- Open a day.
- Click Add Transaction or Add Scheduled Transaction.
- The create sheet opens with the clicked date already filled in.
Change paid status from the day view
- Open a day.
- Click the paid or unpaid button on a transaction row.
- The button updates immediately and the daily total refreshes from the live register state.
Budgets
The Budget tab is where you decide what you want your money to do before you spend it. If you have never used a budget before, think of it as a written plan for your income and expenses. A budget helps you answer questions like: How much can I spend on groceries? Am I setting aside enough for bills? How much room do I have left this month? Which categories are going over plan?
What a budget is
A budget is a plan for money over a period of time. In Finance Register, a budget is usually built for a year and then broken down month by month. Each category gets a planned amount. Later, the app compares your real transactions to that plan so you can see where you are on track, ahead, or behind.
- Budget amount: what you planned to spend or receive.
- Actual amount: what really happened in your transactions.
- Variance: the difference between the plan and reality.
- Rollover: whether unused money carries into the next month for that category.
What a budget is for
- To keep regular bills under control.
- To plan for groceries, gas, subscriptions, and other monthly spending.
- To make sure income is covering expenses.
- To prepare for irregular costs such as gifts, repairs, school items, or holidays.
- To help you notice problems early instead of after the month is over.
Important idea: A budget is not there to make life complicated. It is there to make future spending easier to judge. Once it is set up, your question becomes “Is this still within the plan?” instead of “Can I afford this?” every single time.
Step 1: Create your first budget
- Open the Budget tab.
- Click to create a new budget.
- Enter a budget name. A simple name like 2026 Household Budget works well.
- Choose the fiscal start month and year.
- Save the budget.
New budgets start empty on purpose. That is a good thing. It lets you add only the categories that matter to you instead of filling the screen with categories you never use.
Step 2: Decide what should be in the budget
Before entering numbers, think through the main categories of money in your life. Most people should start with only the essentials and then add more detail later.
- Income: paycheck, side income, benefits, other regular deposits.
- Housing: rent, mortgage, insurance, utilities.
- Food: groceries, restaurants, coffee, delivery.
- Transportation: fuel, repairs, tolls, insurance.
- Debt: credit card payments, loans.
- Personal spending: entertainment, shopping, subscriptions.
- Savings: transfers to savings, emergency fund, sinking funds.
Beginner rule: Start with fewer categories than you think you need. A simple budget that you keep updated is better than a perfect budget that is too much work to use.
Step 3: Add categories to the budget
- Use the quick-add area at the top of the budget planner.
- Choose whether you are adding an Expense or Income category.
- Type the category name or choose one from suggestions.
- Add only the categories you want to actively plan.
Step 4: Enter planned amounts
- Find the category row in the annual grid.
- Enter the amount you want for each month.
- If the amount is the same every month, enter the first month and use the row copy icon to fill the whole year.
- If the amount changes by season, edit the months individually.
Examples:
- Rent may be the same every month.
- Electricity may be lower in spring and higher in summer.
- Gifts may be small most of the year and much higher in November and December.
Step 5: Use rollover only where it makes sense
Rollover is useful when a category is not meant to reset every month. For example, if you budget $100 per month for car repairs but only spend $20, you may want the unused $80 to stay available later.
- No rollover: the category restarts fresh every month.
- Carry all: unused or overused amounts carry forward.
- Positive only: only underspending carries forward.
Good use for rollover: repairs, gifts, home maintenance, annual fees, school costs, pet expenses, or any category where money is being saved up over time.
Step 6: Use Fill from Averages carefully
Fill from Averages is a shortcut that uses your past transaction history to build a starting budget. This is useful if you do not know where to begin.
- Click Fill from Averages.
- Review every category amount it creates.
- Adjust categories that should change in the future instead of copying the past exactly.
History is a good starting point, but it is not always the right target. If last year included unusual spending, correct the budget manually.
How to use the budget in daily life
Once the budget is set up, the real value comes from checking it regularly. Most people do best with a simple routine.
Weekly routine
- Enter or import transactions as you normally do.
- Open the Budget tab once or twice a week.
- Look at categories that are close to the limit or already over plan.
- Adjust your spending decisions before the month gets away from you.
Monthly routine
- At the start of the month, review the planned amounts for the current month.
- Update any categories that need a one-time change.
- During the month, watch the analysis and alerts sections.
- At the end of the month, compare actual results to the plan.
- Use what you learned to improve next month instead of trying to make the old month look perfect.
How to read the budget after it is set up
- If actual is lower than budget: you spent less than planned. That is usually good for expense categories.
- If actual is higher than budget: you spent more than planned. Review that category and decide whether the plan or the behavior needs to change.
- If income is below budget: some expected income has not happened yet, or the plan was too optimistic.
- If rollover categories grow: that category is building reserve for future spending.
A simple first budget example
Imagine a person with:
- $4,000 monthly take-home income
- $1,400 rent
- $500 groceries
- $250 fuel
- $150 subscriptions and entertainment
- $300 debt payments
- $400 savings transfer
That person can create a budget with those core categories first. Later, if they want more detail, they can split food into groceries and restaurants, or split transportation into gas and repairs.
When to change the budget
- When income changes.
- When a major bill changes.
- When a category is consistently unrealistic.
- When you add a new spending goal or savings priority.
A budget is supposed to be adjusted. Updating it is not failure. It is part of using it well.
Budget tools in Finance Register
- Use the annual grid to edit the whole year directly.
- Use the row copy icon to fill the whole year from the first month.
- Use the row clear icon to remove a full year for one category.
- Use Fill from Averages to generate a starting point.
- Use notes to explain unusual months.
- Use the analysis, alerts, and reports sections to review results.
- Use Print Budget... when you want a printable copy.
Best beginner approach: Create the budget, keep it simple, update it once a week, and learn from each month. Do not try to make it perfect on day one.
Reports
The Reports tab turns your account history into printable summaries, trends, category totals, and forecasts. All account types can open Reports, although some report families are more useful for checking, savings, and cash than for liability accounts.
Create a report
- Open the Reports tab.
- Choose a report type from the Report menu.
- Choose a range from the Range menu.
- For Custom, choose both the start and end dates.
Print or export
- Click Print Report... when the report looks right.
- The app generates a PDF and opens it in Preview.
- Print from Preview or save the PDF wherever you want.
- Use Export Report to Spreadsheet... when you want the current report as CSV.
Year-end reporting
- Open the Year-End Summary report when you want a tax-year summary inside the app.
- Use Export Year-End Data... to choose the tax year, included accounts, export types, and destination folder.
- The year-end export can generate multiple files from the same sheet, including detailed CSV, category summary CSV, and the year-end PDF report.
Range behavior: All Time uses your full historical transaction range. YTD in dashboard views means year-to-date through today, not future months.
Savings Goals
Savings goals can track progress three different ways, depending on how you want to manage the money. Savings goals appear on savings-capable dashboard workflows, not on liability-only mortgage and loan dashboards.
Create a goal
- Go to the Dashboard.
- Find the Savings Goals section.
- Click New Goal.
- Enter the goal name and target amount.
- Choose the tracking method that fits the goal.
Choose a tracking method
- Linked Account Balance: tie the goal to a savings account and let the goal update from that account automatically.
- Tagged Transactions: use one or more tags so matching positive tagged transactions contribute to the goal total.
- Manual Contributions: keep the goal separate and add contribution history manually.
Link checking transfers to savings
- Create a transaction from checking.
- Turn on Transfer To Savings.
- Choose the savings account.
- The checking side posts as an expense and the savings side is created automatically.
Insufficient funds: If checking cannot cover the transfer, the savings side shows an exception instead of counting the money as deposited.
Reconcile Account
Use reconcile to match the register against your statement and confirm that the account balance is correct.
Run reconcile
- Open the account you want to reconcile.
- Choose File > Reconcile Account....
- Enter the statement ending date.
- Enter the statement ending balance.
- Select the transactions that cleared on that statement.
Use the reconcile tools
- Use Auto-Clear Paid to preselect posted paid items.
- Use Clear All or Clear None to adjust the whole list quickly.
- Watch the Difference amount until it reaches $0.00.
- Click Finish when the difference is zero.
Why Finish might be disabled: The ending balance must be a valid number and the reconcile difference must be exactly zero before you can finish.
Backups and Restore
Backups protect the file on this Mac, and iCloud Backups can also keep live-account backup copies available across your Apple devices.
Set backup options
- Open Settings > Backups.
- Choose the backup folder, or use Default Location.
- Set whether the app should back up on exit.
- Choose how many backups to keep per account.
- Turn on iCloud Backups if iCloud Drive is available on this Mac and you want Finance Register to also copy live-account backups to iCloud automatically.
Understand backup sources
- Local Backups stay in your selected backup folder on this Mac.
- iCloud Backups are separate from local backups and appear in their own source inside View/Restore Backups.
- If iCloud Drive is unavailable on this Mac, Finance Register keeps local backup behavior working and disables iCloud backup until it becomes available again.
Restore a backup
- Choose View > Restore Backups....
- Choose the Local or iCloud Drive source at the top of the browser.
- Select a backup already listed in the browser, or click Load External Backup File to import an outside
.frcb or .zip backup into the browser.
- Review the preview pane to confirm the account name, dates, file size, transactions, scheduled items, and budgets.
- If the selected backup is encrypted, enter its password when prompted to preview or restore it.
- Click Restore Backup. Finance Register merges the backup into the current file and keeps unrelated current accounts untouched.
- Save the restored working file when prompted.
Export a portable backup
- Choose File > Save a Backup... when you want to create a normal backup in the backup browser and backup folder.
- Choose File > Export Current Backup... when you want a portable backup zip you can move to another Mac.
- The app creates a fresh backup from the current account state.
- If password protection is currently on, the export is encrypted automatically. If password protection is off, the export is created as a normal backup automatically.
- The export is saved as a
.zip file named like the backup list, using the backup name and date.
- Move the zip to another Mac and restore it there.
Portable attachments: Backups and exported backup zips include embedded attachment files, not just file references.
External backups: Use Load External Backup File in the backup browser to import an outside backup zip or .frcb backup, preview it there, and then decide whether to restore it.
Sandbox safety: Sandbox copies are never included in routine local or iCloud backups unless the sandbox is committed and becomes the new live account.
Archive and Archive Viewer
Archive tools let you move older transactions into a separate read-only archive file without treating that archive as a backup.
Create an archive
- Choose File > Archive Old Transactions....
- Select the scope, cutoff date, and whether you want to only archive or archive and remove the archived transactions from the live file.
- Choose the destination
.frca archive file.
- Review the analysis preview, blocked items, warnings, carry-forward handling, and safety-backup options before running the archive.
Open an archive in read-only mode
- Choose File > Open Archive Viewer….
- Select a Finance Register
.frca archive file.
- Review archived transactions, balances, and attachments in the Archive Viewer window.
Important: Archives are for historical review and storage. They are not a replacement for normal backups or exported backup zips.
Password Protection and Encryption
Finance Register can protect the current file and future backups with password-based encryption.
- Open Settings > Data Protection.
- Use the Password Protection section to set, change, or remove the password.
- Turn on Remember password on this Mac if you want the password stored in this Mac’s Keychain for automatic unlock.
- When protection is enabled, the current
.frc file and newly created backups are written in encrypted form.
- When protection is turned off, newly saved files and backups return to normal unencrypted format, but older encrypted backups still require their password.
Important: encrypted backups remain encrypted even after you later turn password protection off. You can still load, preview, and restore them by entering the correct backup password when prompted.
Import and Move Data In
Finance Register supports more than one import workflow. Use the one that matches the account and file you have.
Run Import Transactions
- Open the account you want to import into.
- Choose File > Import Transactions....
- Select a supported transaction file:
.csv, .ofx, .qfx, .qbo, or .qif.
- Choose the destination account or create a new one.
- Review the preview, mapping, warnings, and duplicate detection, then click Import Valid Rows.
What Import Transactions does
- Imports posted transactions into the selected account.
- Supports custom column mapping for CSV files and uses the same normalized preview and duplicate-checking flow for OFX-family and QIF files.
- Shows validation warnings and duplicate candidates before import.
- Imports only valid rows and leaves questionable rows visible instead of silently guessing.
Supported transaction formats
- CSV: generic transaction import with field mapping.
- OFX / QFX / QBO: bank and card transaction downloads that feed the same preview/import pipeline.
- QIF: supported when the file contains enough safe transaction data to normalize into the import preview.
- Not supported:
.qxf files are not part of the transaction importer.
Import a credit card statement CSV
- Open the credit card account you want to update.
- Choose File > Import Credit Card Statement CSV....
- Select the monthly statement CSV downloaded from your card website.
- Review the import summary after the import finishes.
What the credit card statement importer does
- Imports charges, fees, credits, and payments directly into the selected credit card account.
- Checks existing transactions in that same card account so duplicate statement rows are skipped.
- On the first import, can explain whether the starting amount owed already includes the statement being imported.
- Works only when the credit card issuer provides a CSV export. If the issuer does not export CSV, this import path is not available.
Settings, Language, and Region
The Settings window groups global app behavior into categories so startup behavior, appearance, localization, backups, password protection, keyboard shortcuts, and reminders stay organized.
- General: appearance, startup behavior, default account view, formatting, confirmations, save behavior, recent files, and reminders.
- Data Protection: password protection, encryption changes, and whether this Mac should remember the password in Keychain.
- Backups: backup folder, backup-on-exit, how many backups to keep, whether iCloud Backups should also copy live-account backups to iCloud Drive, and how restore and export behave.
- Language & Region: app language, region, currency, and Japanese large-number display when yen formatting is active.
- Keyboard Shortcuts: Window navigation shortcuts and Reports menu shortcuts.
Appearance: choose Light, Dark, or System. System returns the app to the current macOS appearance for the main window, Settings, and other app-managed windows.
iCloud Backups: This is a key protection setting if you want a second backup source beyond your Mac. Finance Register keeps local backups and iCloud backups separate, and the iCloud option is available only when iCloud Drive is currently available for this Mac.
iPhone Companion App
The iPhone app is a companion to the Mac app. It works from a synced Finance Register file and is designed for dashboard viewing, quick transaction entry, mobile review, and bill reminders instead of full desktop-style file management.
How the iPhone app is organized
- Dashboard: current balance, monthly summary, projected balance, upcoming items, recent transactions, account scope, and forecast range.
- Activity: searchable transaction list with mobile filters and quick add.
- Insights: projected balance, upcoming bills and income, spending by category, and pending activity.
- Settings: active synced file, app appearance, bill due notifications, Face ID lock, and app information.
Choose a synced file on iPhone
- Open the iPhone app.
- If no file is active yet, choose a file from Synced Files.
- If nothing appears, open the Mac app and let companion sync publish a file to iCloud first, then refresh on iPhone.
Use the Dashboard tab
- Use the account selector to switch the dashboard scope between all synced accounts or one account.
- Use the range selector to change the current projection window.
- Review Upcoming for near-term scheduled items and Recent Transactions for latest activity.
- Use the sync button when you want to pull fresh data from the Mac-published file.
Use the Activity tab
- Search by payee, category, or amount.
- Open filters when you want to narrow results.
- Use the plus button to add a new mobile transaction.
- Scheduled transactions cannot be edited on iPhone. Edit those in the desktop app.
Use the Insights tab
- Review projected balance health for the selected range.
- Open upcoming bills and income when you want a due-soon view.
- Use spending by category to spot the largest expense groups in the selected range.
- Use the search shortcut from Insights when you need to jump back into Activity with context.
Phone settings and privacy
- Active Synced File: switch which published file the iPhone app is using.
- App Appearance: follow system, always light, or always dark.
- Bill Due Notifications: local reminders for scheduled bills, with reminder timing controls.
- Face ID Lock: require authentication when reopening the app, with a manual Lock Now action.
Data, Privacy, and File Locations
Finance Register is designed as a local-first Mac app. Your working file, backups, attachments, and sync-published data stay under your control unless you choose to move or export them yourself.
Where your data lives
- Your working account is saved as a
.frc file wherever you choose to save it.
- Automatic and manual backups are stored in the selected backup folder.
- When enabled, iCloud Backups also write live-account backup copies to the app’s iCloud Drive backup location and show them separately in the restore browser.
- Exported portable backups are saved as
.zip files wherever you choose to export them.
- The iPhone companion app uses synced file data published from the Mac app instead of opening your desktop working file directly.
What backups include
- Transactions, scheduled transactions, budgets, savings goals, reconcile history, report presets, and liability-account details such as credit card and loan settings.
- Embedded attachment files, so exported backups can move to another Mac more safely.
- Sandbox copies are excluded from normal local and iCloud backup flow until they become committed live accounts.
Restore reminder: Restoring a backup replaces the current in-memory account data first. Save the restored file right away when the app asks where to save it.
Helpful Tips
Common workflow tips
- Use Duplicate Transaction when a new entry is similar to an old one.
- Use tags for flexible search and special-purpose grouping without changing the main category.
- Use account duplication when you want to test scenarios without touching live data.
- Use the calendar when you want a date-first view of the same register activity.
- Keep both local backups and iCloud Backups enabled if you want the strongest everyday recovery setup.
- For credit cards, import the monthly statement CSV instead of re-entering each charge manually when your issuer supports CSV export.
- For mortgages and loans, use the liability dashboards to watch balance owed, payment estimates, and payoff timing instead of expecting the same workflow as checking.
Data safety tips
- Keep a current
.frc working file and regular backups.
- Use Export Backup before moving to another computer.
- Use the built-in restore preview to confirm the correct backup before restoring.
If something looks wrong
- Check the current account first. Most screens are account-specific.
- Check filters and search fields before assuming data is missing.
- Use Undo from the Edit menu for recent changes.
- Restore a backup if you need to roll back to a known good state.
Use this guide as the reference for the current Mac app workflow and the companion iPhone app workflow.